These techniques will help you to make the Gradle build process faster.
Technique #1
- Open up gradle.properties file
- add the following line
org.gradle.daemon=true
Side effects
- Gradle daemon is a background process. If you use this, it might take (300-400) MB memory or more from your system.
- After adding the above line, try to Rebuild the project. If you get error, something like,
Unable to locate a Java Runtime to invoke, very obvious solution, remove the line.
Technique #2
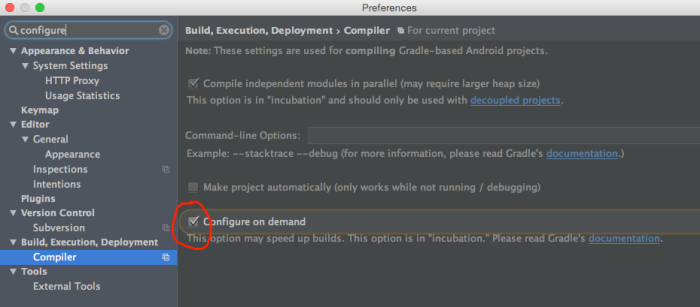
- Open up Android Studio Settings (PC/Linux) or Preference (Mac)
- check Compile independent modules in parallel
Alternatively,
- Open up gradle.properties file
- add the following line
org.gradle.parallel=true
Technique #3
- Open up Android Studio Settings (PC/Linux) or Preference (Mac)
- check Configure on demand
Alternatively,
- Open up gradle.properties file
- add the following line
org.gradle.configureondemand=true
Technique #4
- Open up gradle.properties file
- add the following line
org.gradle.jvmargs=-Xmx2048m -XX:MaxPermSize=512m -XX:+HeapDumpOnOutOfMemoryError -Dfile.encoding=UTF-8
Side effects
The above line means, you are allowing Java compilers to have available memory up to 2 GB (2048 MB). If you do not have available memory to give out 2 GB to Java then you should not add this line.
Another way to say this, If you have enough memory then you can try to tweak the settings.
Technique #5
All the above changes to gradle.properties file can be configures globally instead of changing the settings for every individual project.
Modify or create a file named gradle.properties in the following directory.
For Mac,
/Users/USER_NAME/.gradle/gradle.properties
For Linux,
/home/USER_NAME/.gradle/gradle.properties
For Windows,
C:\Users\USER_NAME\.gradle\gradle.properties
and apply the above changes. Finally it should look like,
org.gradle.daemon=true

# When configured, Gradle will run in incubating parallel mode.
# This option should only be used with decoupled projects. More details, visit
# http://www.gradle.org/docs/current/userguide/multi_project_builds.html#sec:decoupled_projects
org.gradle.parallel=true

org.gradle.configureondemand=true

# Specifies the JVM arguments used for the daemon process.
# The setting is particularly useful for tweaking memory settings.
# Default value: -Xmx10248m -XX:MaxPermSize=256m
org.gradle.jvmargs=-Xmx2048m -XX:MaxPermSize=512m -XX:+HeapDumpOnOutOfMemoryError -Dfile.encoding=UTF-8
Technique #6
- Open up Android Studio Settings (PC/Linux) or Preference (Mac)
- check Compile independent modules in parallel
Side effects
Apply this option after all of your libraries are downloaded and configured correctly. Gradle try to resolve the dependencies from internet, every time we build our project. This option will force the gradle to resolve the dependencies from cache. You may need to uncheck the option if you add/modify a library.
Technique #7
If you are using google play services, then try to use only the library you need. For example, if you need maps, then use
compile 'com.google.android.gms:play-services-maps:7.5.0'
instead of:
compile 'com.google.android.gms:play-services:7.5.0'
Technique #8
Consider using separate flavors for development and production.
android {
    productFlavors {
        // Define separate dev and prod product flavors.
        dev {
            // dev utilizes minSDKVersion = 21 to allow the Android gradle plugin
            // to pre-dex each module and produce an APK that can be tested on
            // Android Lollipop without time consuming dex merging processes.
            minSdkVersion 21
        }
        prod {
            // The actual minSdkVersion for the application.
            minSdkVersion 14
        }
    }
          ...
    buildTypes {
        release {
            runProguard true
            proguardFiles getDefaultProguardFile('proguard-android.txt'),
                                                 'proguard-rules.pro'
        }
    }
}
dependencies {
  compile 'com.android.support:multidex:1.0.0'
}
for further details,
https://developer.android.com/tools/building/multidex.html#dev-build
Technique #9
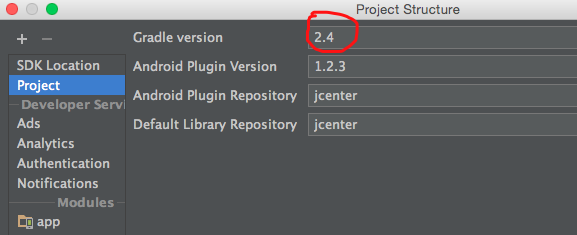
Try to use Gradle 2.4, it has a huge performance boost over previous versions.
- Open up Android Studio Project Structure option. File -> Project Structure
- Write value 2.4 as Gradle Version
Technique #10
- Open up app level build.gradle file. (Inside app directory)
- add the following line
dexOptions {

incremental true

}
android {
    compileSdkVersion 22
    buildToolsVersion 1.2.3

    defaultConfig {
        applicationId "com.wordpress.tausiq.sampleapp"
        minSdkVersion 16
        targetSdkVersion 22
        versionCode 1
        versionName "1.0"
    }
    buildTypes {
        release {
            minifyEnabled false
            proguardFiles getDefaultProguardFile('proguard-android.txt'), 'proguard-rules.pro'
        }
    }

    dexOptions {
        incremental true
    }
}
Side effects
Enabling this could cause your builds to fail (especially on consecutive runs). If error occurs you can try to build again. Or, if it doesn’t work for you then skip it.
Technique #11
Try not to use Build -> Rebuild Project every time to check for compile errors or after a small change. Rather use, Build -> Make Project, it is much faster than previous option.
References:
- http://stackoverflow.com/questions/16775197/building-and-running-app-via-gradle-and-android-studio-is-slower-than-via-eclips/17286002#17286002
- http://jimulabs.com/2014/10/speeding-gradle-builds/
- https://medium.com/@erikhellman/boosting-the-performance-for-gradle-in-your-android-projects-6d5f9e4580b6


C programming details here http://www.secufoon.com